Featured
For Better IELTS Exam Preparations, Should I Gave up My Sleep

We have heard since we were young children that skipping sleep will help us study for tests more effectively. But did you know that this could impact how your brain functions? Yes, getting too little sleep will affect how well your brain functions. In order to improve your IELTS exam preparations, it is vital that you do not sacrifice your sleep. On the other side, allow us to inform you that sleeping in too late is harmful to both your physical and emotional health. As a result, when it comes to sleeping, you must attempt to achieve balance.
To the best of your knowledge, when you sleep, your brain is engaged and specific hormone changes take place to maintain your health. Therefore, getting enough sleep is crucial for your health and capacity to complete duties with the highest efficiency. Even while preparing for the IELTS exam, you must follow a schedule that allows you to get a good night’s sleep. so that you can study for the IELTS exam the next day with renewed vigor and vitality.
Without a question, getting enough sleep is crucial to achieving high scores in the IELTS exam. It is a crucial component of the strategy that ensures exam success. Every expert will advise you to avoid sacrificing your sleep in order to improve your exam preparation.
Would you like to improve your English Speaking skills in order to ace the IELTS exam? If so, contact the top school known for providing a top-notch English speaking course in Jalandhar.
Consider the following advice to learn how lack of sleep can affect your IELTS exam score:
Mood issues
Keep in mind that mood and sleep have a profound relationship. According to research, sleep deprivation can cause mood disorders like agitation, rage, and anxiety. This will undoubtedly have a detrimental effect on how you approach the IELTS exam preparation. You must maintain an optimistic outlook for it. However, being sleep-deprived will never allow you to be optimistic. Therefore, stay away from any plans that would include giving up sleep in favor of greater IELTS exam preparation. In fact, enjoy a good night’s sleep to study the idea in depth and with renewed energy.
Inadequate focus
Undoubtedly, you can understand the material more effectively and clearly if you have high-focus skills. A strong ability to focus is a key factor in our capacity to succeed in exams. However, if you lack sleep, it can seriously impair your capacity for focus. To perform well on the IELTS exam, especially the listening section, you must work to increase your concentration capacity. Your ability to concentrate will suffer, and you’ll become restless. As a result, you should refrain from skipping sleep.
Inadequate critical thinking
Any exam requires critical thinking, thus you need it to do well. To master the IELTS exam, you must also focus on developing your critical thinking skills. To understand, evaluate, and remember the concepts, you need to exercise your intellect. If you aren’t used to getting enough sleep, you cannot accomplish this. The early-to-bed and early-to-wake approach can help you develop your critical thinking, according to research. Therefore, give this approach a try if you find it difficult to make the right choices after conducting a thorough investigation. This will be useful for the writing portion of the IELTS exam, which specifically asks you to respond to a certain circumstance in writing.
Drowsiness
You must have felt exhausted the following day as a result of skipping the previous night’s sleep. You can never give a task your best effort while you’re tired. In fact, a lack of sleep can significantly impair your ability to coordinate your muscles and eyes. Sleep deprivation will not, therefore, help you perform better on the IELTS exam. In order to comprehend the ideas with the greatest efficiency, you must be active enough.
Are you interested in receiving help from highly qualified experts to improve your knowledge of the English language? If so, sign up for the top school that provides a top-notch English speaking course in Ludhiana.
Conclusion
We sincerely hope that this post has aided in your comprehension of the importance of getting enough sleep for the best IELTS exam preparation. Instead of compromising your sleep, you should strive to get 8 hours of better-quality sleep every night by regularly exercising and meditating.


The article is briefing about “orange box on chromebook”. Chromebooks are renowned for their simplicity and reliability, but occasional issues may arise. One such issue is the appearance of an orange box on the screen, which can be puzzling for users. In this guide, we’ll delve into the causes of the orange box on Chromebook and explore effective solutions to resolve it.
Introduction to Chromebook Orange Box Issue
The orange box issue on Chromebook refers to a notification or visual indicator that appears unexpectedly on the screen, causing confusion and inconvenience for users. Understanding the root cause of this issue is essential for troubleshooting and restoring normal functionality.
Understanding the Orange Box Notification
The orange box notification typically appears in the corner of the screen or within a specific application window on Chromebook. It may indicate various issues, including system updates, network connectivity problems, or software conflicts. Identifying the specific cause of the orange box is the first step towards resolving the issue.
Causes of the Orange Box on Chromebook
Several factors may contribute to the appearance of this box on Chromebook, including:
- Software glitches or bugs
- Outdated system software
- Network connectivity issues
- Corrupted cache or cookies
- Incompatible browser extensions or settings
Resolving The Issue
To resolve the orange box issue on Chromebook, try the following methods:
Method 1: Restarting Your Chromebook
A simple restart can often resolve temporary glitches or software conflicts that may be causing this to appear.
Method 2: Checking for Updates
Ensure that your Chromebook’s operating system and applications are up to date by checking for and installing any available updates.
Method 3: Clearing Cache and Cookies
Clearing your Chromebook’s cache and cookies can help resolve browser-related issues and improve overall performance.
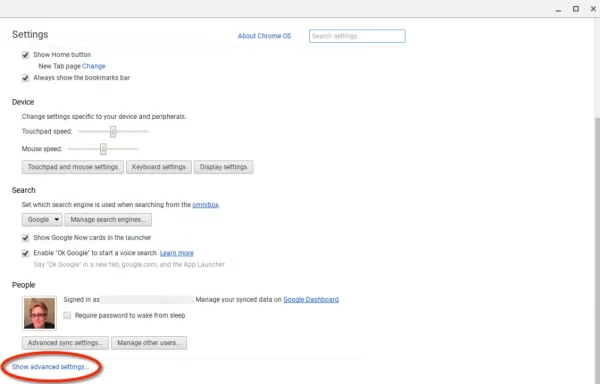
Method 4: Resetting Chrome Settings
Resetting your Chrome browser settings to their default values can help eliminate any misconfigurations or conflicts that may be causing the box to appear.
Method 5: Running the Chromebook Diagnostics
Chromebooks come with built-in diagnostic tools that can help identify and resolve hardware or software issues. Running diagnostic tests may provide insight into the underlying cause of the box problem.
Seeking Professional Help
If this issue persists despite troubleshooting efforts, consider seeking assistance from Chromebook support forums or contacting Google support for further assistance.
Tips to Prevent the Orange Box Issue
- Regularly update your Chromebook’s operating system and applications.
- Avoid installing unnecessary browser extensions or plugins.
- Practice safe browsing habits and avoid visiting suspicious websites.
- Perform routine maintenance tasks, such as clearing cache and cookies, to keep your Chromebook running smoothly.
Conclusion
In conclusion, the orange box issue on Chromebook can be a minor annoyance, but with the right troubleshooting steps, it can be resolved effectively. By understanding the causes of the this and implementing proactive measures to prevent it, users can enjoy a seamless and trouble-free Chromebook experience.
FAQs
What does the orange box on Chromebook signify?
- This box on Chromebook typically signifies a notification or alert. It can indicate various issues such as system updates, network connectivity problems, or software conflicts.
Why is my Chromebook showing an orange box after startup?
- If your Chromebook is showing this after startup, it could be due to several reasons. It may indicate pending system updates, network connection issues, or software conflicts that need attention.
How can I troubleshoot the orange box issue on my Chromebook?
- To troubleshoot the this issue on your Chromebook, you can try the following steps:
- Restart your Chromebook to see if the issue resolves itself.
- Check for and install any pending system updates.
- Ensure that your Chromebook is connected to a stable Wi-Fi network.
- Clear cache and cookies in your Chrome browser.
- Reset Chrome settings to default values.
- Run Chromebook diagnostics to identify any hardware or software issues.
Does the this indicate a hardware or software problem?
- It indicates a software-related issue rather than a hardware problem. It’s often caused by software glitches, outdated system software, network connectivity issues, or browser conflicts.
Is the orange box issue common on all Chromebook models?
- This issue may occur on any Chromebook model, although its frequency and severity may vary. It’s a common software-related issue that can usually be resolved through troubleshooting steps outlined by Chromebook users and support forums.

A question raised a while “how to remove something from continue watching on peacock”. Peacock, NBCUniversal’s streaming service, offers a seamless viewing experience with its “Continue Watching” feature, allowing users to pick up where they left off across different devices. However, managing your “Continue Watching” list becomes essential for a clutter-free and personalized streaming experience. Here’s how you can remove something from “Continue Watching” on Peacock.
Introduction to Peacock’s “Continue Watching” Feature
Peacock’s “Continue Watching” feature remembers your progress in TV shows, movies, and other content, enabling you to resume watching from where you left off. While convenient, the list can quickly become cluttered with unfinished content, prompting the need for management.
Understanding the Importance of Managing “Continue Watching”
Managing your “Continue Watching” list is crucial for maintaining a streamlined viewing experience. By removing unwanted or unfinished items, you can focus on content that truly interests you and discover new favorites without distractions.
Why You Might Want to Remove Items from “Continue Watching”
There are several reasons why you might want to remove items from your “Continue Watching” list on Peacock. These include wanting to declutter your list, removing content you’re no longer interested in, or starting fresh with recommendations based on your current preferences.
How to Remove Items from “Continue Watching” on Peacock
Removing items from your “Continue Watching” list on Peacock is a straightforward process. Follow the steps below to tidy up your viewing history and personalize your streaming experience.
Step-by-Step Guide to Removing Items from “Continue Watching”
Open Peacock App:
- Launch the Peacock app on your preferred device or visit the Peacock website in your browser.
Navigate to “Continue Watching”:
- Locate the “Continue Watching” section on the homepage or in the main menu of the Peacock app.
Select the Content to Remove:
- Scroll through your “Continue Watching” list and select the content you want to remove.
Access Options Menu:
- Look for the three dots or ellipsis icon next to the selected item to access the options menu.
Choose “Remove from Continue Watching”:
- Select the “Remove from Continue Watching” option from the menu.
Confirm Removal:
- Confirm your decision to remove the item from your “Continue Watching” list when prompted.
Repeat if Necessary:
- Repeat the process for any additional items you wish to remove from your list.
Alternative Solutions and Workarounds
In addition to removing items individually, Peacock may offer bulk removal options or settings to customize your “Continue Watching” preferences. Explore the app’s settings menu or consult Peacock’s support resources for alternative solutions and workarounds.
Tips for Preventing Items from Appearing in “Continue Watching”
To prevent unwanted items from appearing in your “Continue Watching” list in the future, consider marking content as watched, adjusting playback settings, or using separate user profiles for different viewing preferences.
Addressing Common Issues and Concerns
If you encounter any issues or difficulties while removing items from your “Continue Watching” list, reach out to Peacock’s customer support for assistance. They can provide guidance and troubleshooting tips to resolve any issues you may encounter.
Impact of Removing Items on Recommendations and Viewing Experience
Removing items from your “Continue Watching” list may influence Peacock’s recommendations and personalized content suggestions. By curating your viewing history, you can refine the recommendations to better align with your interests and preferences.
Sharing the Peacock Experience with Others
Share your Peacock experience with friends and family by recommending your favorite shows, movies, and exclusive content. Encourage them to explore Peacock’s extensive library of entertainment options and discover new favorites together.
Community Feedback and Support
Join the Peacock community forums and social media groups to connect with fellow users, share tips and tricks, and provide feedback to Peacock’s development team. Your input helps shape the future of the platform and enhances the overall user experience.
Conclusion: Taking Control of Your Peacock Viewing Experience
In conclusion, managing your “Continue Watching” list on Peacock allows you to take control of your viewing experience and tailor it to your preferences. By removing unwanted items, exploring alternative solutions, and providing feedback, you can optimize your Peacock experience and enjoy seamless streaming on your terms.

Let’s explore common problems and solutions related to hisense tv volume button. Are you experiencing issues with the volume button on your Hisense TV? Don’t worry; you’re not alone.
Introduction to Hisense TVs
Hisense is a renowned brand known for its high-quality televisions. It offering innovative features and advanced technology to enhance the viewing experience.
Importance of Volume Buttons on TVs
Volume buttons are essential components of any TV remote control, allowing users to adjust the audio output to their preferred levels. They play a crucial role in ensuring an immersive and enjoyable entertainment experience.
Overview of Hisense TV Volume Button Functionality
Hisense TVs come equipped with volume buttons either on the remote control or on the TV itself. It providing users with convenient access to audio adjustments.
Common Issues with Hisense TV Volume Buttons
Unresponsive Volume Buttons
One of the most common issues encountered with Hisense TV volume buttons is unresponsiveness, where pressing the buttons fails to adjust the volume as intended.
Stuck Volume Buttons
Stuck volume buttons can prevent users from smoothly adjusting the audio levels on their Hisense TVs, causing frustration and inconvenience.
Volume Control Malfunctions
In some cases, Hisense TV volume buttons may malfunction, resulting in erratic volume adjustments or complete loss of functionality.
Troubleshooting Tips for Hisense TV Volume Button Problems
- Check Remote Batteries: Ensure that the batteries in your remote control are functioning correctly and replace them if necessary.
- Clean the Buttons: Dust and debris buildup can interfere with button functionality, so gently clean the volume buttons and the surrounding area.
- Power Cycle the TV: Sometimes, a simple power cycle can resolve minor issues with Hisense TV volume buttons. Turn off the TV, unplug it from the power source, wait for a few minutes, and then plug it back in.
Contacting Hisense Customer Support for Assistance
If troubleshooting steps fail to resolve the volume button issues on your Hisense TV, don’t hesitate to reach out to Hisense customer support for further assistance. They can provide guidance and support to address the problem effectively.
Conclusion
In conclusion, Hisense TV volume button issues can be frustrating but manageable with the right approach. By following the troubleshooting tips and seeking assistance from Hisense customer support when needed, you can restore optimal functionality to your TV.
FAQs
Why are my Hisense TV volume buttons unresponsive?
- Unresponsiveness of the volume buttons on your Hisense TV remote could be due to several reasons, including battery issues, dirt or debris accumulation, or internal malfunction of the remote itself. It’s also possible that the TV’s software may need updating or there could be hardware issues with the TV.
How can I clean the volume buttons on my Hisense TV remote?
- To clean the volume buttons on your Hisense TV remote, you can use a soft, lint-free cloth slightly dampened with water or isopropyl alcohol. Gently wipe the surface of the buttons to remove any dirt, oil, or residue that may be causing them to be unresponsive. Avoid using harsh chemicals or excessive moisture that could damage the remote.
What should I do if my Hisense TV volume buttons are stuck?
- If the volume buttons on your Hisense TV remote are stuck, try gently tapping the remote against your palm to dislodge any debris or particles that may be causing the buttons to stick. You can also carefully pry around the stuck button with a small, thin tool to free it. However, be cautious not to damage the remote further.
Is it possible to control the volume on a Hisense TV without the remote?
- Yes, it’s possible to control the volume on a Hisense TV without the remote. Most Hisense TVs come with physical volume buttons located on the TV itself. Alternatively, if your TV supports HDMI-CEC (Consumer Electronics Control), you may be able to control the volume using a compatible HDMI-CEC enabled device or universal remote.
How long does Hisense customer support take to respond to inquiries about volume button issues?
- The response time from Hisense customer support regarding volume button issues may vary depending on factors such as the volume of inquiries, the complexity of the issue, and the efficiency of the customer support team. Generally, it’s recommended to contact Hisense customer support directly for an estimated response time based on their current workload and service standards.
 Others10 months ago
David T Bolno: Why Giving Back To The Community Is So Crucial
 Travel10 months ago
Practical And Essential Car Interior Accessories To Add Comfort And Convenience To Your Drive
 Travel10 months ago
Business Visa for CANADA
 Business10 months ago
Top Reasons Why you Need to Consider Outsourcing Real Estate Photo Editing
 Health10 months ago
Garlic Is The Best Vegetable To Treat Heart Problems
 Business10 months ago
Dead And Co Setlist What They Played At The Gorge Amphitheatre
 Fashion10 months ago
Tips For Choosing The Right For Engagement Diamond Rings
 Tech10 months ago
The Best Way to Never Get Lost: Buy Wayfinding Signs!