Featured
Digital Signage Solutions: How They Can Benefit Your Business

Digital signage solutions can do more than just help you advertise to your customers – they can also help you save money and increase productivity throughout your organization. Just how, exactly, does this type of signage help improve the business? Let’s take a look at four ways digital signage solutions can benefit your business.
What Is Digital Signage?
Digital signage solutions are a type of visual communication that uses digital displays to deliver information and messages to viewers. Digital signage can be used for many purposes and is typically positioned in high-traffic areas such as entrances, hallways, and lobby areas so that it’s visible to as many people as possible. In addition to displaying advertisements, digital signage can also be used to display company announcements and upcoming events.
The Benefits Of Digital Signage:
1) Increased Productivity – Digital signage is often used in retail stores, but this type of signage can also be used to increase productivity for employees. For example, digital signs can be placed near the entrance that displays information about your company’s culture or provides tips on how to be successful. This is an effective way to keep employees on track with deadlines and goals while they’re at work.
2) Improved Efficiency – Digital signage solutions allow you to update a message quickly and inexpensively, meaning you won’t have to spend time and money printing new posters every time you want to make an announcement or change your hours of operation.
3) Reduced Paper Usage – When it comes to reducing paper usage and other resources, digital signage is a great solution.
You May Also Like:
- Digital Menu Boards
- video wall controller
- Digital Signage Hardware
- Easy To Use Digital Signage
- Touch Screen Digital Signage Systems
Some Considerations For Going Mobile:
E-Signage is a type of digital signage that can be displayed on any screen – including a laptop, tablet, or smartphone. While it’s not for everyone, there are many benefits to e-signage when compared to traditional in-store signage. For example, with e-signage, you have the ability to move your message around and change as needed without having to get up from your desk. You can also send messages directly to employees’ devices so they know what needs to be done without being interrupted by customers or supervisors.
Selecting The Right Solution:
One of the first decisions you’ll have to make when purchasing a digital signage solution is which type of display you want to use. There are three types of displays that we recommend for businesses, and each one has its own set of pros and cons. In order to help you determine which one is best for your needs, here’s a quick breakdown of the three options available:
1. LCD Displays – The first type is LCD displays, also known as liquid crystal displays. These types of displays are typically used in retail settings since they can be mounted on walls or ceilings. What makes them unique is that they can display more colors than other types like LED or plasmas.
5 Ways To Get Started With Your Own Project:
- Create a business plan.
- Identify your target audience and the message you want to send.
- Obtain signage equipment that fits your needs.
- Choose a venue for installation.
- Connect to an external power source or upload content onto a USB key drive
1. Create a business plan 2. Identify your target audience and the message you want to send 3. Obtain signage equipment that fits your needs 4. Choose a venue for installation 5. Connect to an external power source or upload content onto a USB key drive

The beauty of a well-lit garden is undeniable. With the thoughtful installation of landscape lighting, you can turn your outdoor area into an enchanting haven. Not only does this aesthetic enhancement bring charm, but it also contributes to the functionality and safety of your outdoor environment. Lighting is key whether you’re guiding guests along a path or drawing attention to a prized plant. This guide will explore how landscape lighting can enhance your space, offering practical tips on selection, placement, and maintenance to suit any garden’s needs. Imagine a garden illuminated by gentle lights highlighting its most beautiful features—sounds magical, right? With the right choices, your garden can become a nighttime haven. Focused lights can illuminate pathways for safer evening strolls, and strategically placed features can transform your yard into a dreamy landscape. Continue reading to learn how to make the most of what lighting offers.
Introduction to Landscape Lighting
Landscape lighting is more than just an added detail to your garden; it is an integral part of outdoor design that can amplify beauty and safety. As homeowners increasingly realize the value of lighting, interest in innovative solutions has flourished even with holiday lighting. Not limited to aesthetic enhancement, well-planned lighting can create a welcoming and secure environment, turning a garden into a place to relax or entertain regardless of the time of day. From spotlighting a majestic tree to creating a glowing path for safe navigation, it’s pivotal in inviting an outdoor space.
Choosing the Right Lighting for Your Garden
Selecting the proper lighting for your garden involves understanding the functions and the moods you wish to evoke. With their focused beams, spotlights are perfect for creating dramatic effects around statues or architectural plants. On the other hand, path lights add a warm glow to guide guests while enhancing safety. Choices in light intensity and color significantly influence ambiance, with warm white lights offering coziness and brighter hues fitting vibrant, energetic gatherings. An integral consideration is balancing between aesthetic desires and functional requirements.
Techniques to Highlight Your Yard’s Best Features
Apply a mix of lighting techniques to truly bring your yard to life. Prominent features like statues or large trees benefit from spotlighting, creating a dramatic focal point. Path lighting should be subtle yet effective, guiding visitors safely while accentuating the intricate details of garden paths. Delicate accent lighting on water features can cast enchanting reflections and lend a tranquil aspect to the garden’s atmosphere. Learn more about selecting the perfect setup with guides that offer practical tips and creative ideas.
Sustainable Lighting Options
Sustainability is gaining more significance in home design, such as outdoor lighting. Lights powered by solar energy are an excellent option for individuals looking to reduce energy use without sacrificing quality. LED bulbs are also efficient, providing brighter light output and longer lifespans than traditional bulbs. Adopting eco-friendly energy options for your garden helps the planet and can result in lasting reductions in utility expenses, perfectly combining accountability with practicality.
Practical Tips for Installing Outdoor Lighting
Embarking on a DIY lighting installation project requires careful preparation. Sketch a rough garden layout to identify where lights and power sources will be. Essential tools, such as a voltage tester and wire strippers, ensure a smooth setup. Install the transformers, then run the cables strategically to connect them to your lights. For a professional finish, conceal all electrical elements, maintaining aesthetic appeal and safety. When executed correctly, even a simple setup can have a transformative effect on the space.
Safe Practices to Consider
Safety must be balanced when installing outdoor lighting. Electrical installations need special attention to prevent accidents. Selecting waterproof fixtures is crucial to avoid damage from the elements. All wiring should be correctly insulated, and connections checked regularly. Using a ground fault circuit interrupter (GFCI) further enhances safety, cutting power in case of a short circuit. Ensuring all elements are robust and secure can prevent potential issues, letting you enjoy your beautifully lit garden without concerns.
Common Mistakes to Avoid
Even the most carefully planned gardening projects can only go awry with attention to detail. One common pitfall is over-lighting, which can overwhelm the senses and create disorienting glare. Similarly, under-lighting fails to showcase the garden’s potential and might leave dangerous shadows. Position each fixture thoughtfully to prevent unwanted glare or poorly lit areas, ensuring all garden elements are harmoniously illuminated. Lighting is, at its core, an art; balance is key to achieving the desired effect.
The Future of Landscape Lighting
The field of landscape lighting is ever-evolving and influenced by technological advancements. Smart lighting systems offer luxurious convenience, allowing users to control settings remotely via mobile apps. These systems adapt effortlessly to varying occasions, enriching the outdoor living experience. Additionally, innovative color-changing LEDs provide opportunities for playful experimentation, offering dynamic displays that can change with the seasons or mood. The future of landscape lighting is bright, promising enhancements that blend functionality with artistry in the most inspired ways.

You can carefully operate your agricultural machinery and equipment, always choose original spare parts, and still encounter breakdowns and loss of productivity. How and why might this happen? Just skimp on fuel and lubrication materials or buy them from unreliable sources.
It is not necessary to spend a lot of money, but it is always important to pay attention to the subtleties of the choice.
Here are a few of them:
- Don’t be lazy, open the service book of your machinery or equipment and carefully read the characteristics.
- Octane number is a very important, do not ignore this indicator.
- Climatic conditions and their changes affect engine operation. For example, diesel fuel can thicken in winter; winter fuel should be used.
- The presence of international standards and certificates indicates the reliability of the manufacturer; always check their availability among all fuels and lubricants for sale.
- Don’t experiment with alternative types of fuels. Be sure to check if they are compatible with your equipment.
You should also be responsible with lubricants. Each lubricant has characteristics that are suitable for a specific type of equipment. You can select engine oils, bearings, and so on. The most important technical characteristic is viscosity. Compliance with the indicators will ensure proper operation.
You can now buy lubricants and fuel additives online on one website: https://usa.vas.trade/fuel-and-lubricants-materials, without wasting extra time searching. “VAS” agricultural bulletin board is designed to enable the farmer to shop securely wherever he is and can buy all-important items in one place.
However, this is not a complete description. The entire site is a clear yet in-depth catalog of agricultural products and services. Any action on the website, except advertising and promotion, is free and without any hidden commissions.
Wholesale fuels & lubricants, like retail ones, are in the same section. Using sorting tools, you can highlight the ones you need and further speed up the search for products. Each ad has a detailed description, photos from all sides and video reviews from YouTube.
To purchase, you need to write to the online chat or call; the phone number is always in the publication.
If the seller has the “negotiated price” button active, you can safely start bargaining. Reviews about the seller are visible on the page, which will help you decide on purchasing the product much faster.
The article is briefing about “orange box on chromebook”. Chromebooks are renowned for their simplicity and reliability, but occasional issues may arise. One such issue is the appearance of an orange box on the screen, which can be puzzling for users. In this guide, we’ll delve into the causes of the orange box on Chromebook and explore effective solutions to resolve it.
Introduction to Chromebook Orange Box Issue
The orange box issue on Chromebook refers to a notification or visual indicator that appears unexpectedly on the screen, causing confusion and inconvenience for users. Understanding the root cause of this issue is essential for troubleshooting and restoring normal functionality.
Understanding the Orange Box Notification
The orange box notification typically appears in the corner of the screen or within a specific application window on Chromebook. It may indicate various issues, including system updates, network connectivity problems, or software conflicts. Identifying the specific cause of the orange box is the first step towards resolving the issue.
Causes of the Orange Box on Chromebook
Several factors may contribute to the appearance of this box on Chromebook, including:
- Software glitches or bugs
- Outdated system software
- Network connectivity issues
- Corrupted cache or cookies
- Incompatible browser extensions or settings
Resolving The Issue
To resolve the orange box issue on Chromebook, try the following methods:
Method 1: Restarting Your Chromebook
A simple restart can often resolve temporary glitches or software conflicts that may be causing this to appear.
Method 2: Checking for Updates
Ensure that your Chromebook’s operating system and applications are up to date by checking for and installing any available updates.
Method 3: Clearing Cache and Cookies
Clearing your Chromebook’s cache and cookies can help resolve browser-related issues and improve overall performance.
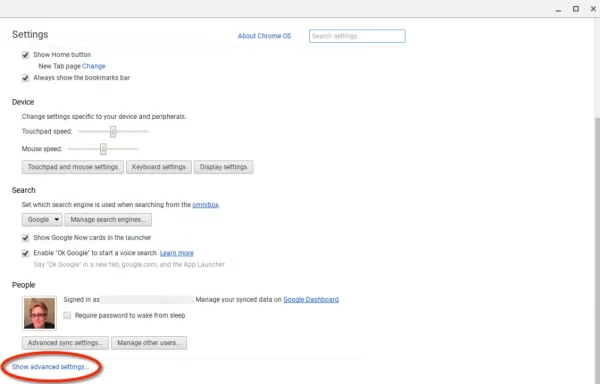
Method 4: Resetting Chrome Settings
Resetting your Chrome browser settings to their default values can help eliminate any misconfigurations or conflicts that may be causing the box to appear.
Method 5: Running the Chromebook Diagnostics
Chromebooks come with built-in diagnostic tools that can help identify and resolve hardware or software issues. Running diagnostic tests may provide insight into the underlying cause of the box problem.
Seeking Professional Help
If this issue persists despite troubleshooting efforts, consider seeking assistance from Chromebook support forums or contacting Google support for further assistance.
Tips to Prevent the Orange Box Issue
- Regularly update your Chromebook’s operating system and applications.
- Avoid installing unnecessary browser extensions or plugins.
- Practice safe browsing habits and avoid visiting suspicious websites.
- Perform routine maintenance tasks, such as clearing cache and cookies, to keep your Chromebook running smoothly.
Conclusion
In conclusion, the orange box issue on Chromebook can be a minor annoyance, but with the right troubleshooting steps, it can be resolved effectively. By understanding the causes of the this and implementing proactive measures to prevent it, users can enjoy a seamless and trouble-free Chromebook experience.
FAQs
What does the orange box on Chromebook signify?
- This box on Chromebook typically signifies a notification or alert. It can indicate various issues such as system updates, network connectivity problems, or software conflicts.
Why is my Chromebook showing an orange box after startup?
- If your Chromebook is showing this after startup, it could be due to several reasons. It may indicate pending system updates, network connection issues, or software conflicts that need attention.
How can I troubleshoot the orange box issue on my Chromebook?
- To troubleshoot the this issue on your Chromebook, you can try the following steps:
- Restart your Chromebook to see if the issue resolves itself.
- Check for and install any pending system updates.
- Ensure that your Chromebook is connected to a stable Wi-Fi network.
- Clear cache and cookies in your Chrome browser.
- Reset Chrome settings to default values.
- Run Chromebook diagnostics to identify any hardware or software issues.
Does the this indicate a hardware or software problem?
- It indicates a software-related issue rather than a hardware problem. It’s often caused by software glitches, outdated system software, network connectivity issues, or browser conflicts.
Is the orange box issue common on all Chromebook models?
- This issue may occur on any Chromebook model, although its frequency and severity may vary. It’s a common software-related issue that can usually be resolved through troubleshooting steps outlined by Chromebook users and support forums.
 Others2 years ago
David T Bolno: Why Giving Back To The Community Is So Crucial
 Travel2 years ago
Practical And Essential Car Interior Accessories To Add Comfort And Convenience To Your Drive
 Travel2 years ago
Business Visa for CANADA
 Fashion2 years ago
Tips For Choosing The Right For Engagement Diamond Rings
 Tech2 years ago
The Best Way to Never Get Lost: Buy Wayfinding Signs!
 Business2 years ago
Top Reasons Why you Need to Consider Outsourcing Real Estate Photo Editing
 Business2 years ago
Dead And Co Setlist What They Played At The Gorge Amphitheatre

 Travel1 year ago
Exploring the Best Places with myfavouriteplaces.org:// blog